0%

Springboot 学习笔记,核心自动配置

社区版的 Idea 少了一些配置,从网上下下来的 initializr 直接倒入的还一些配置可能失效,可以看文件前缀判断

HelloWorld web mode

  1. 访问 Initializr 定制项目, dependencies 选 Spring Web 即可
  2. 下载项目 jar 文件并解压,使用 Idea import,构建项目
  3. Springboot 的项目结构和 Springmvc 基本一样,在 HelloWorldApplication 同级目录下创建 controller 包并添加 controller 类
  4. Springboot 项目默认集成 tomcat,直接运行 application class 即可启动服务器
  5. 该 tomcat 应该是优化过的,启动速度飞起,访问 http://localhost:8080/hello 可以看到返回 hello 字符串
  6. 查看 idea 右边的 maven tab, 在 Lifecycle 下双击执行 package 打包项目
  7. 可以看到打包好的项目 Building jar: ...\helloworld\target\helloworld-0.0.1-SNAPSHOT.jar
  8. 到对应的路径下,cmd 窗口输入 java -jar helloworld-0.0.1-SNAPSHOT.jar 可以直接启动
1
2
3
4
5
6
7
@RestController
public class TestController {
@GetMapping("/hello")
public String hello() {
return "hello";
}
}

HelloWorld idea mode

  1. Idea -> file -> new -> project -> Spring Initialzr
  2. 填入必要信息,可以修改 package 简化路径
  3. 其他步骤和上面的练习一样

彩蛋:banner 替换,在 resources 下新建 banner.txt 文件,替换终端启动图标

Autowired 替代方案

方案一 可以通过把注解放到对应的 setter 方法上绕过

1
2
3
4
5
6
InitBean initBean;

@Autowired
public void setInitBean(InitBean initBean) {
this.initBean = initBean;
}

方案二 放入构造函数中自动识别

1
2
3
4
5
6
7
public class InitTraceSourceEventListener implements ApplicationListener<ApplicationReadyEvent> {
InitBean bean;

public InitTraceSourceEventListener(InitBean bean) {
this.bean = bean;
}
}

方案三 用 @Resource 代替

1
2
@Resource
InitBean bean;

或者最粗暴的: Settings -> Editor -> Code Style -> Inspections -> Spring Core -> Code -> Field injection warning 选项 disable 掉

自动配置原理初探

  1. 核心依赖都在父工程中
  2. 写入依赖时不需要指定版本,父类 pom 已经管理了

启动器, 即 Springboot 的启动场景

1
2
3
4
<dependency>
<groupId>org.springframework.boot</groupId>
<artifactId>spring-boot-starter</artifactId>
</dependency>

各种场景有对应的启动器,比如 spring-boot-starter-web, 开发时只需要找到对应的启动器即可

主程序

这部分需要 实操+完善 好几遍才行,流程有点长

1
2
3
4
5
6
7
8
9
//@SpringBootApplication 标注这个类是一个 springboot 应用
@SpringBootApplication
public class Hello02Application {

public static void main(String[] args) {
// 启动应用
SpringApplication.run(Hello02Application.class, args);
}
}

主要注解关系

1
2
3
4
5
6
7
@SpringBootApplication 
@SpringBootConfiguration - springboot 配置
@Configuration - spring 配置类
@Component - 说明时一个 spring 组件
@EnableAutoConfiguration
@AutoConfigurationPackage
@Import(AutoConfigurationPackages.Registrar.class)

结论:Springboot 所有自动配置都是在启动的时候扫描并加载(spring.factories). 所有的自动配置配都在里面,但不一定生效。要判断条件是否成立,只有导入了对应的启动器(starter), 才会生效。

spring-boot-autoconfiguration.jar 包含所有的配置

SpringApplication.run() 完了可以深入了解一下,不过,前面的自动装备更重要

YAML 给属性赋值

  • yaml 和 properties 是可以共存的
  • 共存时 properties 的优先级要高于 yaml
  • yaml 的后缀可以是 yaml 或 yml 都可以生效

yaml 格式:

1
2
server:
port: 8081

可以直接给对象赋值

基本赋值用法

通过添加 @Value 实现

1
2
3
4
5
6
7
8
9
10
11
12
13
14
15
16
17
18
19
20
21
22
23
24
25
26
import org.springframework.beans.factory.annotation.Value;
import org.springframework.stereotype.Component;

@Component
@Data
@NoArgsConstructor
@AllArgsConstructor
public class Dog {
@Value("旺财")
private String name;
@Value("3")
private int age;
}

@SpringBootTest
class DogTest {
@Autowired
private Dog dog;

@Test
public void test() {
System.out.println(dog);
}
}

// output: Dog(name=旺财, age=3)

yaml 配置属性

配置 pom 依赖

1
2
3
4
5
<dependency>
<groupId>org.springframework.boot</groupId>
<artifactId>spring-boot-configuration-processor</artifactId>
<optional>true</optional>
</dependency>

类添加 @ConfigurationProperties 注解

1
2
3
4
5
6
7
8
9
10
11
12
13
14
@Component
@Data
@NoArgsConstructor
@AllArgsConstructor
@ConfigurationProperties(prefix = "person")
public class Person {
private String name;
private int age;
private boolean isHappy;
private Date birth;
private Map<String, Object> maps;
private List<Object> lists;
private Dog dog;
}

添加 application.yaml 文件并设置属性

1
2
3
4
5
6
7
8
9
10
person:
name: jack
age: 30
isHappy: true
birth: 2020/01/01
maps: {k1: v1, K2: v2}
lists: [1, 2, 3]
dog:
name: 旺财
age: 2
1
2
3
4
5
6
7
8
9
10
11
@SpringBootTest
class PersonTest {
@Autowired
private Person person;

@Test
public void test() {
System.out.println(person);
}
}
// output: Person(name=jack, age=30, isHappy=false, birth=Wed Jan 01 00:00:00 CST 2020, maps={k1=v1, K2=v2}, lists=[1, 2, 3], dog=Dog(name=旺财, age=2))

PS: yaml 还支持各种随机占位符,一元表达式等,可扩展性要更强

通过 properties 配置

缺点:表示起来比较冗余

1
2
3
4
5
6
7
8
9
10
11
12
13
14
15
@Component
@Data
@NoArgsConstructor
@AllArgsConstructor
@PropertySource(value="classpath:application.properties")
public class Person {
@Value("${name}")
private String name;
private int age;
private boolean isHappy;
private Date birth;
private Map<String, Object> maps;
private List<Object> lists;
private Dog dog;
}

JSR 303 校验

spring 自带的验证注解,添加之后可以再给 bean 赋值的时候带上校验效果

添加依赖

1
2
3
4
<dependency>
<groupId>org.springframework.boot</groupId>
<artifactId>spring-boot-starter-validation</artifactId>
</dependency>

数据配置

1
2
mailbox:
email: 123

添加 @Validated, @Email 等注解

1
2
3
4
5
6
7
8
9
10
11
12
13
14
15
16
17
18
19
20
21
22
23
24
25
26
27
28
29
30
import org.springframework.boot.context.properties.ConfigurationProperties;
import org.springframework.stereotype.Component;
import org.springframework.validation.annotation.Validated;

import javax.validation.constraints.Email;

@Component
@Data
@NoArgsConstructor
@AllArgsConstructor
@ConfigurationProperties(prefix = "mailbox")
@Validated
public class MailBox {

@Email(message = "Email format is incorrect!!!")
private String email;
}

// 测试用例
@SpringBootTest
class MailBoxTest {
@Autowired
private MailBox box;

@Test
public void test() {
System.out.println(box);
}
}
// 抛异常:org.springframework.boot.context.properties.bind.validation.BindValidationException

默认配置文件优先级

方式一:root/config > root/. > classpath:/config > classpath:/.

方式二: 新建 application-xx.properties, 再 default 中的配置文件中通过 spring.profile.active=xx 指定激活的配置

方式三:yaml + —

1
2
3
4
5
6
7
8
9
10
11
12
13
14
15
16
17
server:
port: 8081
spring:
profiles:
active: dev

---
server:
port: 8082
spring:
profiles: dev

---
server:
port: 8083
spring:
profiles: test

application.properties 中支持的属性源码中在哪里写的

  1. SpringBoot 启动会加载大量的配置类
  2. 我们看需要的功能有没有在 SpringBoot 默认写好的自动配置类当中
  3. 再看这个配置类中到底配置了哪些组件
  4. 给容器中自动皮欸之类添加组件的时候,会从 properties 类中获取某些属性

xxxAutoConfiguration: 自动配置类,给容器添加组件

xxxProperties:封装配置文件中相关属性

debug=true 可以查看配置详情

静态资源加载原理

分析一波 WebMvcAutoConfiuration.java
-> webjars, web 相关的包封装成 Java 模式,但是不建议这么做

优先级: resources > script > public

首页定制 getIndexHtml()

template 文件夹下的内容需要使用模板引擎,添加 dependency + 注解

thymeleaf

导入 starter

1
2
3
4
<dependency>
<groupId>org.springframework.boot</groupId>
<artifactId>spring-boot-starter-thymeleaf</artifactId>
</dependency>

在 template 下新建页面文件 test.html,新建 controller 文件夹并创建 controller

1
2
3
4
5
6
7
8
9
10
<!DOCTYPE html>
<html lang="en" xmlns:th="http://www.thymeleaf.org">
<head>
<meta charset="UTF-8">
<title>Title</title>
</head>
<body>
<div th:text="${msg}"></div>
</body>
</html>
1
2
3
4
5
6
7
8
@Controller
public class TestController {
@RequestMapping("/hello")
public String test(Model model) {
model.addAttribute("msg", "hello, springboot");
return "test";
}
}

启动服务,访问 localhost:8080/hello 可以看到新建的页面

MVC 配置原理

https://docs.spring.io/spring-boot/docs/2.1.6.RELEASE/reference/html/boot-features-developing-web-applications.html

自定义视图解析器 @Configuration + implement WebMvcConfigurer 接口

1
2
3
4
5
6
7
8
9
10
11
12
13
14
15
16
17
18
19
// 定制功能只需要鞋各组件,然后交给 springboot,他会帮我们自动装配
// dispatchservlet
@Configuration
public class MyMvcConfig implements WebMvcConfigurer {

// ViewResolver 实现了视图解析器的接口类,我们可以把它看作是退解析器
@Bean
public ViewResolver myViewResolver() {
return new MyViewResolver();
}

public static class MyViewResolver implements ViewResolver {

@Override
public View resolveViewName(String viewName, Locale locale) throws Exception {
return null;
}
}
}

在 DispatcherServlet 的 doDispatch 方法打上断点,在 this 下的 viewResolver 变量中可以看到自定义的解析器

@Configuration 修饰的类可以帮你扩展功能

员工管理模块案例

1
2
3
4
5
6
7
8
9
// config 下通过 WebMvcConfigurer 管理首页会更合适一点
@Configuration
public class MyMvcConfig implements WebMvcConfigurer {
@Override
public void addViewControllers(ViewControllerRegistry registry) {
registry.addViewController("/").setViewName("index");
registry.addViewController("/index.html").setViewName("index");
}
}

关闭 thymeleaf cache

1
2
3
spring:
thymeleaf:
cache: false

i18n 国际化实现

  1. resource 下新建 i18n 文件夹,添加 properties(默认 login.properties + 语言支持版本 login_en_US.properties, login_zh_CN.properties)
  2. 自定义 LocaleResolver 做切换
  3. 自定义组件配置到 Spring 容器中 @Bean
  4. 用 #{} 替换模板

源码中在 WebMvcAutoConfiguration 类中有配置 localeResolver 方法,通过这个引出自定义的类实现

1
2
<a class="btn btn-sm" th:href="@{/index.html(l='zh_CN')}">中文</a>
<a class="btn btn-sm" th:href="@{/index.html(l='en_US')}">English</a>
1
2
3
4
5
6
7
8
9
10
11
12
13
14
15
16
17
18
19
20
21
22
23
24
25
26
27
28
29
30
31
32
33
34
35
36
37
// 自定义 resolver
public class MyLocaleResolver implements LocaleResolver {
//解析请求
@Override
public Locale resolveLocale(HttpServletRequest request) {

//获得请求中的语言参数
String language = request.getParameter("l");

Locale locale = Locale.getDefault(); //如果没有就使用默认的

//如果请求的连接携带了国际化的参数
if (!StringUtils.isEmpty(language)) {
//zh_CN
String[] split = language.split("_");
//国家,地区
locale = new Locale(split[0], split[1]);

}

return locale;
}

@Override
public void setLocale(HttpServletRequest httpServletRequest, HttpServletResponse httpServletResponse, Locale locale) {

}
}

// 在自定义 config 类中通过 @Bean 注册
public class MyMvcConfig implements WebMvcConfigurer {
// ...
@Bean
public LocaleResolver localeResolver() {
return new MyLocaleResolver();
}
}

通过 session + 拦截器实现强制登录

LoginController 在登录成功的时候 set 一下 session

1
2
3
4
5
6
7
8
9
10
@RequestMapping("/user/login")
public String login(...Model model, HttpSession session) {

//具體的業務:
if ( !StringUtils.isEmpty(username) && "123456".equals(password)) {
session.setAttribute("loginUser", username);
return "redirect:/main.html" ;
}
//...
}

定制拦截器实现 HandlerInterceptor 接口

1
2
3
4
5
6
7
8
9
10
11
12
public class LoginHandlerInterceptor implements HandlerInterceptor {
@Override
public boolean preHandle(HttpServletRequest request, HttpServletResponse response, Object handler) throws Exception {
Object loginUser = request.getSession().getAttribute("loginUser");
if (loginUser == null) {
request.setAttribute("msg", "Please login first...");
request.getRequestDispatcher("/index.html").forward(request, response);
return false;
}
return true;
}
}

在 config 类中注册

1
2
3
4
5
6
7
8
9
@Configuration
public class MyMvcConfig implements WebMvcConfigurer {
@Override
public void addInterceptors(InterceptorRegistry registry) {
registry.addInterceptor(new LoginHandlerInterceptor())
.addPathPatterns("/**")
.excludePathPatterns("/index.html", "/", "/user/login", "/css/**", "/js/**", "/img/**");
}
}

thymeleaf 标签修改方式

1
2
3
4
5
原来: <script type="text/javascript" src="asserts/js/jquery-3.2.1.slim.min.js" ></script>
修改: <script type="text/javascript" th:src="@{/js/Chart.min.js}"></script>


<link th:href="@{/css/bootstrap.min.css}" rel="stylesheet">

记录一下公司实际项目中新老两种 XML 解析框架的实现方式,作为以后类似问题的参考

老的实现方式

用的是最传统的 SAX 解析模式,优点是很直观,在这个模块规模还小的时候挺好的,只要熟悉 SAX 的使用方式上手很快,但是不管什么功能,在经过十几年的反复堆砌之后都会变成一个难以维护的怪物。

实现的时候,最大的弊端应该是参杂了很多的业务逻辑到解析过程中,就我看来,解析就应该是纯粹的过程,业务相关的验证应该放到解析后做才对!

重构前:

  • 最外层有 3k 的代码来解析 xml
  • 最外层到 DefaultHandler 接口,中间还有 2 个父类继承关系存放各种公共变量和方法
  • 所有的模块组都在一个 class 中维护代码,很臃肿,很多冗余
  • 一些公共的 element, 比如 description, label 之类的每个模块都可能出一些奇葩用法,维护更难
  • 在最外层的 Handler 实现中需要存储很多变量来存储中间状态的值

实现伪代码

1
2
3
4
5
6
7
8
9
10
11
12
13
14
15
16
17
18
19
20
21
22
23
24
25
26
27
28
29
30
31
32
33
34
35
36
37
38
39
40
41
42
43
44
45
46
47
48
49
50
51
52
53
54
55
56
57
58
59
60
61
62
63
64
65
public class LegacyParser extends SuperParser3...SuperParser1 {

private ParsedResultBean bean;
private ModuleElement1 element1;
private ModuleElement2 element1;
...
private ModuleElementN elementn;


private Map<String, IModuleElement> elementGroup1 = new HashMap();
...
private Map<String, IModuleElement> elementGroupn = new HashMap();

// 多种重载的构造函数包含 module 各自的 flag 参数,再定制后面 module 内容部的处理逻辑
public LegacyParser(ParsedResultBean bean) {...}
public LegacyParser(ParsedResultBean bean, boolean moduleFlag1) {...}
public LegacyParser(ParsedResultBean bean, boolean moduleFlag1, boolean moduleFlag2) {...}

// 定义一个集合存储可用解析器
private Map<String, ElementParser> availableParsers = new HashMap();

private class ElementParser1 extends BaseElementParser...DefaultHander implements IElementParser {

@Override
public String getElementName() {
return ElementName1;
}

@Override
public void startElement(String uri, String localName, String qName, Attributes attrs) throws SAXException {
// module logic
elementGroup1.put(...);
}

@Override
public void endElement(String uri, String localName, String qName) throws SAXException {
// do something
}

private void moduleMehtods(...) {
// do something
}
}

private class ElementParser2...N extends BaseElementParser...DefaultHander implements IElementParser {}

// 最外部一个
@Override
public void startElement(String uri, String localName, String name, Attributes attrs) throws SAXException {
if (availableParsers.containsKey(name)) {
elementParsers.get(name).startElement(uri, localName, name, attrs);
} else {
throw new SAXException("Unexpected element " + name);
}
}

@Override
public void endElement(String uri, String localName, String name, Attributes attrs) throws SAXException {
if (availableParsers.containsKey(name)) {
elementParsers.get(name).endElement(uri, localName, name, attrs);
} else {
throw new SAXException("Unexpected element " + name);
}
}
}

简单记录一下 Java 解析 xml 的例子。

基本概念

  • DefaulHandler: 为了简化代码将几个常用的 handler 合并为这个 DefaultHandler
  • EntityResolver: 提供获取外部文件的方法, Spring 在介些 xml 的时候也定义过这个方法,可以参考下
  • DTDHandler: 这个类都没有使用例子,是不是一个很冷门的类啊 (; ̄ェ ̄) 以后有机会看到再记录把
  • ContentHandler: 负责处理 xml 节点的逻辑
  • ErrorHandler: 结合 DTD 处理异常
  • systemId: 外部资源(多半是DTD)的URI,比如本地文件 file:///usr/share/dtd/somefile.dtd 或者网络某个地址的文件 http://www.w3.org/somefile.dtd
  • publicId: 和 systemId 类似,区别在于间接性
    • publicID 就相当于一个名字,这个名字代表了一个外部资源。比如,我们规定 W3C HTML 4.01 这个字符串对应 http://www.w3.org/somedir/somefile.dtd 这个资源。那么,publicID="W3C HTML 4.01"systemID="http://www.w3.org/somedir/somefile.dtd" 是一样的,二者都引用了 http://www.w3.org/somedir/somefile.dtd 作为该文档的外部DTD。
  • xmlReader.setFeature(url, flag): 用来表示某个特定的验证规则是否打开了
  • XML schema, 就是我们在 Spring 项目中经常能看到的 .xsd 文件,他是 DTD 的替代品,支持的验证功能更多,格式和 XML 一致

基本套路:

  1. 自定义一个 hander 继承 DefaultHandler, 重写其中的解析逻辑
  2. 客户端代码中通过 SAXParserFactory 拿到 parser
  3. parser 中传入要解析的文件和自定义 handler
  4. parse 是 handler 中定义的 bean 被解析
  5. parse 完成后重 handler 中拿到解析结果

下面展示的例子都存在 mybatis 的 repo 的

TODO

  • add URL here
  • SAX 是怎么做到事件触发的,光想想找不到思路。。。得看看源码

资源

Parse xml 并生成对应的实体类

1
2
3
4
5
6
7
8
9
10
11
12
13
14
15
16
17
18
19
20
21
22
23
24
25
26
27
28
29
30
31
32
33
34
35
36
37
38
39
40
41
42
43
44
45
46
47
48
49
50
51
52
53
54
55
56
57
58
59
60
61
62
63
64
65
66
67
68
69
70
71
72
73
74
75
76
77
78
79
80
81
82
83
84
85
86
87
88
89
90
91
92
93
94
95
96
97
98
99
100
101
102
103
@Data
public class Employee {
private int id;
private String name;
private String gender;
private int age;
private String role;
}

// 自定义 handler,解析 element 并被 emp bean 赋值
public class MyHandler extends DefaultHandler {

// List to hold Employees object
private List<Employee> empList = null;
private Employee emp = null;
private StringBuilder data = null;

// getter method for employee list
public List<Employee> getEmpList() {
return empList;
}

boolean bAge = false;
boolean bName = false;
boolean bGender = false;
boolean bRole = false;

@Override
public void startElement(String uri, String localName, String qName, Attributes attributes) throws SAXException {

if (qName.equalsIgnoreCase("Employee")) {
// create a new Employee and put it in Map
String id = attributes.getValue("id");
// initialize Employee object and set id attribute
emp = new Employee();
emp.setId(Integer.parseInt(id));
// initialize list
if (empList == null)
empList = new ArrayList<>();
} else if (qName.equalsIgnoreCase("name")) {
// set boolean values for fields, will be used in setting Employee variables
bName = true;
} else if (qName.equalsIgnoreCase("age")) {
bAge = true;
} else if (qName.equalsIgnoreCase("gender")) {
bGender = true;
} else if (qName.equalsIgnoreCase("role")) {
bRole = true;
}
// create the data container
data = new StringBuilder();
}

@Override
public void endElement(String uri, String localName, String qName) throws SAXException {
if (bAge) {
// age element, set Employee age
emp.setAge(Integer.parseInt(data.toString()));
bAge = false;
} else if (bName) {
emp.setName(data.toString());
bName = false;
} else if (bRole) {
emp.setRole(data.toString());
bRole = false;
} else if (bGender) {
emp.setGender(data.toString());
bGender = false;
}

if (qName.equalsIgnoreCase("Employee")) {
// add Employee object to list
empList.add(emp);
}
}

@Override
public void characters(char ch[], int start, int length) throws SAXException {
data.append(new String(ch, start, length));
}
}

// 测试用例
@Test
public void test_myhandler() {
SAXParserFactory saxParserFactory = SAXParserFactory.newInstance();
try {
SAXParser saxParser = saxParserFactory.newSAXParser();
MyHandler handler = new MyHandler();

ClassLoader classLoader = getClass().getClassLoader();
File file = new File(Objects.requireNonNull(classLoader.getResource("employees.xml")).getFile());

saxParser.parse(file, handler);
//Get Employees list
List<Employee> empList = handler.getEmpList();
//print employee information
for (Employee emp : empList)
System.out.println(emp);
} catch (ParserConfigurationException | SAXException | IOException e) {
e.printStackTrace();
}
}

测试用 employees.xml

1
2
3
4
5
6
7
8
9
10
11
12
13
14
15
16
17
18
19
20
21
22
23
24
25
26
<Employees>
<Employee id="1">
<age>29</age>
<name>Pankaj</name>
<gender>Male</gender>
<role>Java Developer</role>
</Employee>
<Employee id="2">
<age>35</age>
<name>Lisa</name>
<gender>Female</gender>
<role>CEO</role>
</Employee>
<Employee id="3">
<age>40</age>
<name>Tom</name>
<gender>Male</gender>
<role>Manager</role>
</Employee>
<Employee id="4">
<age>25</age>
<name>Meghna</name>
<gender>Female</gender>
<role>Manager</role>
</Employee>
</Employees>

SAXParser Vs XMLReader

SAXParser 和 XMLReader 的关系:SAXParser 隶属于 javax 包, XMLReader 是从 saxproject 这个项目拿过来的。他们都可以读取 xml, SAXParser 底层还是调用了 XMLReader, 前者调用简单,只提供常规用法,后者使用稍显繁琐,但是可以实现的定制化功能多。

类关系上:SAXParser 继承了 AbstractSAXParser, AbstractSAXParser 实现了 XMLReader 接口

1
2
3
4
5
6
7
8
9
10
11
12
13
14
15
16
17
18
19
20
21
22
23
24
25
26
27
28
29
30
31
@Test
public void saxParser_vs_xmlReader() throws ParserConfigurationException, SAXException, IOException {
String emp =
"<Employee id=\"1\">\n" +
" <age>29</age>\n" +
" <name>Pankaj</name>\n" +
" <gender>Male</gender>\n" +
" <role>Java Developer</role>\n" +
" </Employee>";

MyHandler handler = new MyHandler();

// Parse with sax parser
System.out.println("SaxParser result: ");
SAXParserFactory factory = SAXParserFactory.newInstance();
SAXParser saxParser= factory.newSAXParser();
saxParser.parse(new InputSource(new StringReader(emp)), handler);
System.out.println(handler.getEmpList());

System.out.println("XMLReader result: ");
XMLReader xmlReader = SAXParserFactory.newInstance().newSAXParser().getXMLReader();
xmlReader.setContentHandler(handler);
xmlReader.parse(new InputSource(new StringReader(emp)));
System.out.println(handler.getEmpList());
}

//output, 第二次打印的时候
// SaxParser result:
// [Employee(id=1, name=Pankaj, gender=Male, age=29, role=Java Developer)]
// XMLReader result:
// [Employee(id=1, name=Pankaj, gender=Male, age=29, role=Java Developer), Employee(id=1, name=Pankaj, gender=Male, age=29, role=Java Developer)]

ErrorHandler + DTD 验证 XML

在原来的基础上,我们想要在解析 xml 的时候添加一些限制,比如 Employee 元素必须包含 gender 不然抛错。这种功能可以通过添加 DTD 规则并且打开 xml 验证功能来实现。

定义 DTD 文件,DTD 中会包含 xml 各个 element 的从属关系,可以设置的属性值,属性数量等信息。如下方的例子中我们就规定 Employee 元素必须有至少一个的 gender 信息, 并且 Employee 必须包含 id 属性

1
2
3
4
5
6
7
8
9
10
11
12
13
14
15
16
17
18
19
20
21
22
23
24
25
26
27
28
29
30
31
32
33
34
35
36
37
38
39
40
41
42
43
44
45
46
47
48
49
50
51
52
53
54
55
56
57
58
59
60
61
62
public class MyErrorHandler implements ErrorHandler {
@Override
public void warning(SAXParseException exception) throws SAXException {
show("--Warning--", exception);
throw (exception);
}

@Override
public void error(SAXParseException exception) throws SAXException {
show("--Error--", exception);
throw (exception);
}

@Override
public void fatalError(SAXParseException exception) throws SAXException {
show("--Fatal Error--", exception);
throw (exception);
}

private void show(String type, SAXParseException e) {
System.out.println(type + ": " + e.getMessage());
System.out.println("Line " + e.getLineNumber() + " Column " + e.getColumnNumber());
System.out.println("System ID: " + e.getSystemId());
}
}

@Test
public void test() throws ParserConfigurationException, SAXException, IOException {
String str_with_dtd =
"<?xml version=\"1.0\" encoding=\"UTF-8\"?>\n" +
"<!DOCTYPE Employees [\n" +
" <!ELEMENT Employees (Employee)*>\n" +
" <!ELEMENT Employee (age?, name?, gender+, role*)>\n" +
" <!ATTLIST Employee\n" +
" id CDATA #REQUIRED\n" +
" >\n" +
" <!ELEMENT age (#PCDATA)>\n" +
" <!ELEMENT name (#PCDATA)>\n" +
" <!ELEMENT gender (#PCDATA)>\n" +
" <!ELEMENT role (#PCDATA)>\n" +
" ]>\n" +
"<Employees>\n" +
" <Employee id=\"1\">\n" +
" <age>29</age>\n" +
" <name>Pankaj</name>\n" +
// " <gender>Male</gender>\n" +
" <role>Java Developer</role>\n" +
" </Employee>\n" +
"</Employees>";

XMLReader xmlReader = SAXParserFactory.newInstance().newSAXParser().getXMLReader();
xmlReader.setFeature("http://xml.org/sax/features/validation", true);
xmlReader.setErrorHandler(new MyErrorHandler());
xmlReader.parse(new InputSource(new StringReader(str_with_dtd)));
}

// output:
// --Error--: The content of element type "Employee" must match "(age?,name?,gender+,role*)".
// Line 18 Column 16
// System ID: null

// org.xml.sax.SAXParseException; lineNumber: 18; columnNumber: 16; The content of element type "Employee" must match "(age?,name?,gender+,role*)".

Note: 在这个例子中我们只能用 XMLReader, 应为我们只实现了 ErrorHandler 接口。SaxParser 只能处理继承了 DefaultHandler 的类

EntityResolver samples

Spring中使用DelegatingEntityResolver 类作为 EntityResolver 的实现类

1
2
3
4
5
6
7
8
9
10
11
12
13
14
15
@Override
public InputSource resolveEntity(String publicId, String systemId) throws SAXException, IOException {
if (systemId != null) {
// 如果是DTD从这里开始
if (systemId.endsWith(DTD_SUFFIX)) {
return this.dtdResolver.resolveEntity(publicId, systemId);
}
// 如果是XSD从这里开始
else if (systemId.endsWith(XSD_SUFFIX)) {
// 通过调用META-INF/Spring.schemas解析
return this.schemaResolver.resolveEntity(publicId, systemId);
}
}
return null;
}

例二:

1
2
3
4
5
6
7
8
9
10
11
12
13
14
15
16
17
18
19
20
21
22
23
24
25
26
public class MyEntityResolver implements EntityResolver {
@Override
public InputSource resolveEntity(String publicId, String systemId) {
System.out.println(String.format("----- Call MyEntityResolver, PID: %s + SID: + %s", publicId, systemId));
return null;
}
}

@Test
public void test() throws ParserConfigurationException, SAXException, IOException {
String str_with_dtd = "<?xml version=\"1.0\" encoding=\"UTF-8\"?>\n" +
"<!DOCTYPE succession-data-model PUBLIC \"Self_defined_plublic_name\" \"http://self/defined/public/name\">\n" +
"<succession-data-model>\n" +
"</succession-data-model>";

XMLReader xmlReader = XMLReaderFactory.createXMLReader();
xmlReader.setEntityResolver(new MyEntityResolver());
xmlReader.parse(new InputSource(new StringReader(str_with_dtd)));
}

//output:
// ----- Call MyEntityResolver, PID: Self_defined_plublic_name + SID: + http://self/defined/public/name

// java.net.UnknownHostException: self
// at java.net.AbstractPlainSocketImpl.connect(AbstractPlainSocketImpl.java:196)
// ...

在输出了 publicId 和 systemId 之后,他会试图通过 http 拿到 inputStream 中指定的文件数据,但是我随便写的,所以报错了,但是实验目的已经达到了

External DTD/XSD sample

这部分我们可以等到以后看 spring 或者 mybatis 解析 xml 的时候看,直接是现成的例子, 他是通过 EntityResolver 指定的解析规则

XMLFilter 使用案例

解析 XML 时如果需要过滤某些节点,可以使用该技术,优点:避免修改原有逻辑,使得逻辑更清晰,分层

Scenario: 解析 Employee 只处理 deptid = 3 的节点

1
2
3
4
5
6
7
8
9
10
11
12
13
14
15
16
17
18
19
20
21
22
23
24
25
26
27
28
29
30
31
32
33
34
35
36
37
38
39
40
41
42
43
44
45
46
47
48
49
50
51
52
53
54
55
public class FemaleFilter extends XMLFilterImpl {

public FemaleFilter (XMLReader parent)
{
super(parent);
}

@Override
public void startElement(String uri, String localName, String qName, Attributes atts) throws SAXException {
if ("employee".equals(qName) && atts.getValue("deptid").equals("3")) {
super.startElement(uri, localName, qName, atts);
}
}
}

public class FemaleHandler extends DefaultHandler {
@Override
public void startElement(String uri, String localName, String qName, Attributes attributes) {
if ("employee".equals(qName)) {
System.out.printf("QName: %s, id: %s, deptid: %s %n", qName, attributes.getValue("empid"), attributes.getValue("deptid"));
}
}
}

@Test
public void test() throws SAXException, IOException {
String xml = "<?xml version=\"1.0\"?>\n" +
"<personnel>\n" +
" <employee empid=\"332\" deptid=\"24\" shift=\"night\"\n" +
" status=\"contact\">\n" +
" JennyBerman\n" +
" </employee>\n" +
" <employee empid=\"994\" deptid=\"24\" shift=\"day\"\n" +
" status=\"donotcontact\">\n" +
" AndrewFule\n" +
" </employee>\n" +
" <employee empid=\"948\" deptid=\"3\" shift=\"night\"\n" +
" status=\"contact\">\n" +
" AnnaBangle\n" +
" </employee>\n" +
" <employee empid=\"1032\" deptid=\"3\" shift=\"day\"\n" +
" status=\"contact\">\n" +
" DavidBaines\n" +
" </employee>\n" +
"</personnel>";

XMLReader reader = XMLReaderFactory.createXMLReader();
XMLFilter femaleFilter = new FemaleFilter(reader);
femaleFilter.setContentHandler(new FemaleHandler());
femaleFilter.parse(new InputSource(new StringReader(xml)));
}

// output:
// QName: employee, id: 948, deptid: 3
// QName: employee, id: 1032, deptid: 3

例子里面的示例比较简单,如果判断条件分散在好几个 node 里面,可能解析起来就不方便了,不过得具体问题具体分析

Windows 平台练习 spring 项目的时候,idea 终端 tomcat 乱码,不方便调试排错,可以改动如下

先确定 tomcat 本身是不是有乱码。先启动一个 tomcat,查看 Windows 终端的显示情况,这部分可以查看 tomcat 安装目录的配置文件 C:\Program Files\Apache Software Foundation\Tomcat 9.0\conf\logging.properties,所有的编码设置成 UTF-8 encoding = UTF-8

配置 Idea 编码选项

  1. Editor -> File Encoding, Global 和 Project 都设置成 UTF-8
  2. Java compiler 页面的 ‘Additional command line parameters:’ 添加 -encoding utf-8
  3. 项目的 tomcat 服务器 VM options: 添加 -Dfile.encoding=UTF-8
  4. Help -> Edit Custom VM Options... 添加配置 -Dfile.encoding=utf-8

从定义上来说 final 表达的是只能赋值一次,赋之后不能改变的意思。下面介绍几种常见使用形式。

final + attr

这种形式即实体类有 final 变量

1
2
3
4
5
6
7
8
9
10
11
12
13
public class Test {
private final String name;

public Test() {
this.name = "default";
}

public Test(String name) {
this.name = name;
}

// public Test(int i) {} -- compile fail
}

由于 name 由 final 修饰,所以要求每个构造函数都要有 name 的初始化,或者声明时直接赋值。不然不就等于允许在运行时改变 name 值了

static + final + attr

这种形式常见于 class 属性,声明时就得赋值,static block 都不好使

1
2
3
class Test2 {
private static final String name = "Jack";
}

final + method

final is used with a Java method to mark that the method can’t be overridden (for object scope) or hidden (for static). This allows the original developer to create functionality that cannot be changed by subclasses, and that is all the guarantee it provides.

方法不能被重写,防止继承之后方法语意发生变化

1
2
3
4
5
6
7
8
9
10
11
12
class Test3 {
public static final void printT3 () {
System.out.println("printT3...");
}
}

class Sub3 extends Test3 {
@Override // compile error, can't override final method
public final void printT3 () {
System.out.println("sub3...");
}
}

记录一下工作中遇到的操作符优先级的问题,总体的逻辑是:从左到右依次计算

Java Operator Precedence

Operators Precedence
postfix expr++ expr–
unary ++expr –expr +expr -expr ~ !
multiplicative * / %
additive + -
shift << >> >>>
relational < > <= >= instanceof
equality == !=
bitwise AND &
bitwise exclusive OR ^
bitwise inclusive OR |
logical AND &&
logical OR ||
ternary ? :
assignment = += -= *= /= %= &= ^= | = <<= >>= >>>=

逻辑与 和 逻辑非

1
if (null != params && params.isFeatureExist(FeatureEnum.FEATURE_01) && !(ElementTypeEnum.ADDRESS.equals(Element.getElementTypeEnum()) || ElementTypeEnum.BUSINESS_ADDRESS.equals(Element.getElementTypeEnum())) && !ElementTypeEnum.PERSON_GLOBAL_INFO.getElementId().equals(Element.getId()))

从左到右依次判断就完事儿啦。。。感觉上面表格中的 逻辑与 > 逻辑非 的表示还混淆了我的判断(; ̄ェ ̄)

第二章 对象的生成和销毁 读书笔记

实体类有很多构造函数的时候,使用 Builder

In summary, the Builder pattern is a good choice when designing classes whose constructors or static factories would have more than a handful of parameters, especially if many of the parameters are optional or of identical type. Client code is much easier to read and write with builders than with telescoping constructors, and builders are much safer than JavaBeans.

总的来说,builder 模式适用于实体类有多个构造函数并且参数大于 5 个,参数可选并且参数类型相同的情况。

1
2
3
4
5
6
7
8
9
10
11
12
13
14
15
16
17
18
19
20
21
22
23
24
25
26
27
28
29
30
31
32
33
34
35
36
/**
* 简单的多构造函数实体类例子
*/
public class NutritionFacts {
private final int servingSize; // (mL) required
private final int servings; // (per container) required
private final int calories; // (per serving) optional
private final int fat; // (g/serving) optional
private final int sodium; // (mg/serving) optional
private final int carbohydrate; // (g/serving) optional

public NutritionFacts(int servingSize, int servings) {
this(servingSize, servings, 0);
}

public NutritionFacts(int servingSize, int servings, int calories) {
this(servingSize, servings, calories, 0);
}

public NutritionFacts(int servingSize, int servings, int calories, int fat) {
this(servingSize, servings, calories, fat, 0);
}

public NutritionFacts(int servingSize, int servings, int calories, int fat, int sodium) {
this(servingSize, servings, calories, fat, sodium, 0);
}

public NutritionFacts(int servingSize, int servings, int calories, int fat, int sodium, int carbohydrate) {
this.servingSize = servingSize;
this.servings = servings;
this.calories = calories;
this.fat = fat;
this.sodium = sodium;
this.carbohydrate = carbohydrate;
}
}

多构造函数能够工作,但是对客户端来说多个参数的构造函数在调用和阅读上比较容易出错。

为了解决上面的多构造器模式的弊端,还有一种解决方案是采用 简单构造函数 + setter 的方式

1
2
3
4
5
6
7
8
9
10
11
12
13
14
15
16
17
18
19
20
21
22
23
24
25
26
27
28
29
30
31
32
33
34
35
36
37
38
39
40
41

/**
* 简单构造函数 + Setter 的模式
*/
public class NutritionFactsV2 {
// Parameters initialized to default values (if any)
private int servingSize = -1; // Required; no default value
private int servings = -1; // Required; no default value
private int calories = 0;
private int fat = 0;
private int sodium = 0;
private int carbohydrate = 0;

public NutritionFactsV2() {
}

// Setter
public void setServingSize(int val) {
servingSize = val;
}

public void setServings(int val) {
servings = val;
}

public void setCalories(int val) {
calories = val;
}

public void setFat(int val) {
fat = val;
}

public void setSodium(int val) {
sodium = val;
}

public void setCarbohydrate(int val) {
carbohydrate = val;
}
}

弊端:调用是分散的,类属性可能存在不一致;这种模式不可能把一类做成不可变,需要额外的努力来确保线程安全。

以下是建造者模式的实现

1
2
3
4
5
6
7
8
9
10
11
12
13
14
15
16
17
18
19
20
21
22
23
24
25
26
27
28
29
30
31
32
33
34
35
36
37
38
39
40
41
42
43
44
45
46
47
48
49
50
51
52
53
54
55
56
57
58
public class NutritionFacts {
private final int servingSize;
private final int servings;
private final int calories;
private final int fat;
private final int sodium;
private final int carbohydrate;

public static class Builder {
// Required parameters
private final int servingSize;
private final int servings;

// Optional parameters - initialized to default values
private int calories = 0;
private int fat = 0;
private int sodium = 0;
private int carbohydrate = 0;

public Builder(int servingSize, int servings) {
this.servingSize = servingSize;
this.servings = servings;
}

public Builder calories(int val) {
calories = val;
return this;
}

public Builder fat(int val) {
fat = val;
return this;
}

public Builder sodium(int val) {
sodium = val;
return this;
}

public Builder carbohydrate(int val) {
carbohydrate = val;
return this;
}

public NutritionFacts build() {
return new NutritionFacts(this);
}
}

private NutritionFacts(Builder builder) {
servingSize = builder.servingSize;
servings = builder.servings;
calories = builder.calories;
fat = builder.fat;
sodium = builder.sodium;
carbohydrate = builder.carbohydrate;
}
}

客户端调用代码如下

1
NutritionFacts cocaCola = new NutritionFacts.Builder(240, 8).calories(100).sodium(35).carbohydrate(27).build();

多态下使用 Builder 模式

1
2
3
4
5
6
7
8
9
10
11
12
13
14
15
16
17
18
19
20
21
22
23
24
25
26
27
28
29
30
31
32
33
34
35
36
37
38
39
40
41
42
43
44
45
46
47
48
49
50
51
52
53
54
55
56
57
58
59
60
61
62
63
64
65
66
67
68
69
70
71
72
73
74
75
76
77
78
79
80
81
82
83
84
85
86
87
88
89
90
91
92
93
94
95
96
97
98
99
100
101
102
103
104
105
106
107
108
109
110
111
// 父类
public abstract class Pizza {
public enum Topping {HAM, MUSHROOM, ONION, PEPPER, SAUSAGE}

final Set<Topping> toppings;

abstract static class Builder<T extends Builder<T>> {
private EnumSet<Topping> toppings = EnumSet.noneOf(Topping.class);

public T addTopping(Topping topping) {
toppings.add(Objects.requireNonNull(topping));
return self();
}

abstract Pizza build();

// Subclasses must override this method to return "this"
protected abstract T self();
}

Pizza(Builder<?> builder) {
toppings = builder.toppings.clone(); // See Item 50}
}
}

// 子类其一
public class NYPizza extends Pizza {
public enum Size {SMALL, MEDIUM, LARGE}

private final Size size;

private NYPizza(Builder builder) {
super(builder);
this.size = builder.size;
}

@Override
public String toString() {
return "NYPizza{" +
"size=" + size +
", toppings=" + toppings +
'}';
}

public static class Builder extends Pizza.Builder<Builder> {
private final Size size;

public Builder(Size size) {
this.size = Objects.requireNonNull(size);
}

@Override
NYPizza build() {
return new NYPizza(this);
}

@Override
protected Builder self() {
return this;
}
}
}

// 子类其二
public class Calzone extends Pizza {
private final boolean sauceInside;

private Calzone(Builder builder) {
super(builder);
this.sauceInside = builder.sauceInside;
}

@Override
public String toString() {
return "Calzone{" +
"sauceInside=" + sauceInside +
", toppings=" + toppings +
'}';
}

public static class Builder extends Pizza.Builder<Builder> {
private boolean sauceInside = false; // Default

public Builder sauceInside() {
sauceInside = true;
return this;
}

@Override
Calzone build() {
return new Calzone(this);
}

@Override
protected Builder self() {
return this;
}
}
}

// 调用
public class Client {

public static void main(String[] args) {
NYPizza nyPizza = new NYPizza.Builder(NYPizza.Size.LARGE).addTopping(Pizza.Topping.ONION).addTopping(Pizza.Topping.HAM).build();
System.out.println(nyPizza);

Calzone calzone = new Calzone.Builder().sauceInside().addTopping(Pizza.Topping.HAM).addTopping(Pizza.Topping.SAUSAGE).build();
System.out.println(calzone);
}
}

Builder 模式出了比较冗长之外没有其他坏处,而且扩展性好。

问题

  • 使用 final 修饰属性有什么好处?
    • 可以保证对应的变量只被赋值一次,并且 final 修饰的变量必须得赋值

PS: 外部类可以访问内部类的私有变量,这个我之前倒是没有想到的

  • Builder<T extends Builder<T>> 语法

    • 这种语法叫做 递归类型参数(recursive type parameter), 是泛型的一种,指代泛型参数必须是自己的子类,不理解可以先记着
  • protected abstract T self(); 为什么不直接返回 this?

    • 亲自写一下就会发现,builder 本身是个抽象类,所以是没有 this 这个指代的
  • 父类的构造器是 protected 的,不然子类无法继承, 同理 toppings 也应该是 protected 的,不然子类根本就访问不了 (´Д` )

B 站狂神 SpringMVC 教程笔记

01 Servlet review

准备工作 提前本地安装 Tomcat

  1. 访问官网下载安装包
  2. 点击 Binary Distributions 下的 32-bit/64-bit Windows Service Installer (pgp, sha512) 下载 exe 可执行文件
  3. 点击,傻瓜式安装
  4. 点击提示框,启动 访问 http://localhost:8080/ 看到页面则安装成功

配置环境变量:通过上面的傻瓜式安装,Tomcat 默认安装在 C:\Program Files\Apache Software Foundation\Tomcat 9.0 这个路径下

我的电脑 -> 属性 -> 高级系统设置 -> 高级 -> 环境变量, 在系统变量中添加:

变量名
TOMCAT_HOME C:\Program Files\Apache Software Foundation\Tomcat 9.0
CATALINA_HOME C:\Program Files\Apache Software Foundation\Tomcat 9.0

修改变量Path, 在原来的值后面添加 ;%TOMCAT_HOME%\bin;%CATALINA_HOME%\lib

子项目创建

正常步骤建项目,创建 maven 子 module,然后 module 上邮件选中 Add Framework Support -> Web Application 来创建 web app 会比较省事。可以看到在目录中新增了名为 web 的文件夹

在 src 下新建一个测试用 servlet 文件

1
2
3
4
5
6
7
8
9
10
11
12
13
14
15
16
17
18
19
20
21
22
public class HelloServlet extends HttpServlet {
@Override
protected void doGet(HttpServletRequest req, HttpServletResponse resp) throws ServletException, IOException {
// 1. 获取前端参数
String method = req.getParameter("method");
if (method.equals("add")) {
req.getSession().setAttribute("msg", "execute Add...");
}

if (method.equals("delete")) {
req.getSession().setAttribute("msg", "execute Delete...");
}
// 2. 调用业务层
// 3. 试图转发或重定向
req.getRequestDispatcher("/WEB-INF/jsp/test.jsp").forward(req,resp);
}

@Override
protected void doPost(HttpServletRequest req, HttpServletResponse resp) throws ServletException, IOException {
doGet(req, resp);
}
}

web -> WEB-INF 下新建 jsp 文件夹,创建 test.jsp

1
2
3
4
5
6
7
8
9
10
11
<%@ page contentType="text/html;charset=UTF-8" language="java" %>
<html>
<head>
<title>Title</title>
</head>
<body>

${msg}

</body>
</html>

修改 WEB-INF 下的 web.xml 配置路由

1
2
3
4
5
6
7
8
9
10
11
12
13
14
15
<?xml version="1.0" encoding="UTF-8"?>
<web-app xmlns="http://xmlns.jcp.org/xml/ns/javaee"
xmlns:xsi="http://www.w3.org/2001/XMLSchema-instance"
xsi:schemaLocation="http://xmlns.jcp.org/xml/ns/javaee http://xmlns.jcp.org/xml/ns/javaee/web-app_4_0.xsd"
version="4.0">
<servlet>
<servlet-name>hello</servlet-name>
<servlet-class>com.jzheng.servlet.HelloServlet</servlet-class>
</servlet>

<servlet-mapping>
<servlet-name>hello</servlet-name>
<url-pattern>/hello</url-pattern>
</servlet-mapping>
</web-app>

工具栏 -> edit configuration -> 点击 + 号,选中 Tomcat 配置本地 tomcat, 点击 fix -> 启动服务器。访问 http://localhost:8080/springmvn_01_servlet_war_exploded/hello?method=add 可以看 msg 显示在页面上。

PS:应该是哪里配置有问题,视频上面直接访问 http://localhost:8080/hello?method=add 即可,回头看一下前面的 JavaWeb 项目应该就知道了,暂时没什么关系,无伤大雅

SpringMVC start

PS: 在官方文档页面,修改 current 为其他版本可以访问老版本的文档,例如 https://docs.spring.io/spring-framework/docs/4.3.24.RELEASE/spring-framework-reference/

PPS: 这个可以在 Tomcat 配置页面的 Deployment tab 下,将 Application context 内容直接改为 / 即可

特点:

  1. 轻量

  2. 基于响应

  3. 兼容 Spring

  4. 约定优于配置

  5. 功能强大

  6. 简介灵活

  7. 用的人多

  8. 创建子项目,配置为 web app

  9. Porject Structure -> Artifacts,选中项目 -> WEB-INF 下新建 lib 包手动把包导进去(idea 的bug)-> 点击 + 号 -> Library files 全选

  10. resource 下新建 xml 文件,选择 Spring config 类型,可以自带配置信息

  11. 配置 WEB-INF 下的 web.xml

  12. 创建 Controller 添加业务逻辑

  13. 配置启动 Tomcat,访问 URL 看结果

这部分主要是为了讲解 SpringMVC 的原理,真实环境都用注解开发,会方便很多。

SpringMVC 注解版

  1. 创建工程转化为 web app
  2. 在 web 创建 jsp 目录,配置 web.xml 配置内容和之前完全一样
  3. 配置 springmvc-config.xml, 指定注解扫描路径,handler 和视图解析器
  4. 创建 controller 添加注解
1
2
3
4
5
6
7
8
9
10
11
12
13
14
15
16
17
18
19
20
21
22
<?xml version="1.0" encoding="UTF-8"?>
<beans xmlns="http://www.springframework.org/schema/beans"
xmlns:xsi="http://www.w3.org/2001/XMLSchema-instance"
xmlns:context="http://www.springframework.org/schema/context"
xmlns:mvc="http://www.springframework.org/schema/mvc"
xsi:schemaLocation="http://www.springframework.org/schema/beans http://www.springframework.org/schema/beans/spring-beans.xsd http://www.springframework.org/schema/context https://www.springframework.org/schema/context/spring-context.xsd http://www.springframework.org/schema/mvc https://www.springframework.org/schema/mvc/spring-mvc.xsd">

<!-- 自动扫包,让指定包下的注解生效,IOC 容器统一管理 -->
<context:component-scan base-package="com.jzheng.controller"/>

<!-- 让 spring MVC 不处理静态资源(.css .js .html...) -->
<mvc:default-servlet-handler/>

<!-- 代替 HandlerMapping 和 HandlerAdapter-->
<mvc:annotation-driven/>

<!-- 视图解析器: 模板引擎 Thymeleaf, Freemaker 等 -->
<bean class="org.springframework.web.servlet.view.InternalResourceViewResolver">
<property name="prefix" value="/WEB-INF/jsp/"/>
<property name="suffix" value=".jsp"/>
</bean>
</beans>
1
2
3
4
5
6
7
8
9
10
11
@Controller
public class HelloController {

// 指定 URL
@RequestMapping("/hello")
public String hello(Model model) {
// 封装数据
model.addAttribute("msg", "Hello, SpringMVC");
return "hello"; // 被视图解析器处理
}
}

04 回顾

回顾了两种添加 Controller 的方法,还有 RequestMapping 添加在 class 和 method 上的区别

Restful 风格

  • @PathVariable 配置变量
  • @RequestMapping(value = “/add/{a}/{b}”, method = RequestMethod.POST) 配置请求方式
  • @GetMapping(value = “/add/{a}/{b}”) 请求方式简写

专发和重定向

forward,redirect

接受前端参数

简单类型传递

1
public String test(@RequestParam("username") String name, Model model) {}

复杂类型

1
2
3
4
5
6
7
 // http://localhost:8080/t2?username=jack&id=jjjj&age=3
// 终端能打印出对象
@GetMapping("/t2")
public String complexType(User user) {
System.out.println(user);
return "test";
}

乱码

web 文件夹下添加测试用的 jsp

1
2
3
4
5
6
7
8
9
10
11
12
13
14
<%@ page contentType="text/html;charset=UTF-8" language="java" %>
<html>
<head>
<title>Title</title>
</head>
<body>

<form action="/e/t1" method="post">
<input type="text" name="name">
<input type="submit">
</form>

</body>
</html>

创建测试 controller

1
2
3
4
5
6
7
8
9
10
@Controller
public class EncodingController {

@PostMapping("/e/t1")
public String test1(String name, Model model) {
System.out.println("output: " + name);
model.addAttribute("msg", name);
return "test";
}
}

访问 localhost:8080/form.jsp 输入中文,可以看到输出乱码。

解决方案:过滤器

自建过滤器

新建 filter 文件夹,添加过滤器

1
2
3
4
5
6
7
8
9
10
11
12
13
14
15
16
17
18
19
public class EncodingFilter implements Filter {
@Override
public void init(FilterConfig filterConfig) throws ServletException {

}

@Override
public void doFilter(ServletRequest servletRequest, ServletResponse servletResponse, FilterChain filterChain) throws IOException, ServletException {
servletRequest.setCharacterEncoding("utf-8");
servletResponse.setCharacterEncoding("utf-8");

filterChain.doFilter(servletRequest, servletResponse);
}

@Override
public void destroy() {

}
}

web.xml 下配置过滤器

1
2
3
4
5
6
7
8
<filter>
<filter-name>encoding</filter-name>
<filter-class>com.jzheng.filter.EncodingFilter</filter-class>
</filter>
<filter-mapping>
<filter-name>encoding</filter-name>
<url-pattern>/*</url-pattern>
</filter-mapping>

框架自带过滤器

1
2
3
4
5
6
7
8
9
10
11
12
13
<!-- 框架自带的过滤器 -->
<filter>
<filter-name>build_in_encoding_filter</filter-name>
<filter-class>org.springframework.web.filter.CharacterEncodingFilter</filter-class>
<init-param>
<param-name>encoding</param-name>
<param-value>utf-8</param-value>
</init-param>
</filter>
<filter-mapping>
<filter-name>build_in_encoding_filter</filter-name>
<url-pattern>/*</url-pattern>
</filter-mapping>

Json

简单介绍一下 js 对象和字符串的转化

1
2
3
4
5
6
7
8
9
10
11
12
13
14
15
16
17
18
<script type="text/javascript">
var user = {
name: "jack",
age: 3,
gender: "男"
};


console.log(user);

// js 对象转化为 json 对象
var json = JSON.stringify(user);
console.log(json);

// json 对象转化为 JavaScript 对象
var obj = JSON.parse(json);
console.log(obj);
</script>

jackson

  1. 引入 jackson-databind 包
  2. 创建测试类 User
1
2
3
4
5
6
7
8
@Data
@AllArgsConstructor
@NoArgsConstructor
public class User {
private String name;
private int age;
private String gender;
}
1
2
3
4
5
6
7
8
9
10
11
12
13
14
15
16
17
18
19
20
// UserController
@Controller
public class UserController {

@RequestMapping(value="/j1", produces="application/json;charset=utf-8")
@ResponseBody // 不走视图解析器,直接返回字符串
public String json1() throws JsonProcessingException {
// jackson - ObjectMapper
ObjectMapper objectMapper = new ObjectMapper();

// 创建一个对象
User user = new User("杰克", 1, "man");

String ret = objectMapper.writeValueAsString(user);
return ret;
}
}

// user.toString() 返回 User(name=Jack01, age=1, gender=man)
// 访问 /j1 输出:{"name":"Jack01","age":1,"gender":"man"}

结果中包含中文会乱码,这时可以配置 RequestMapping 注解也可以配置 springmvc 配置文件

1
2
3
4
5
6
7
8
9
10
11
12
13
14
15
16
17
18
19
20
21
<!--
beans 头里面确认包含
http://www.springframework.org/schema/mvc
http://www.springframework.org/schema/mvc/spring-mvc.xsd
不然会抛错:通配符的匹配很全面, 但无法找到元素 'mvc:annotation-driven' 的声明
-->
<!-- Jackson 乱码问题 -->
<mvc:annotation-driven>
<mvc:message-converters>
<bean class="org.springframework.http.converter.StringHttpMessageConverter">
<constructor-arg value="UTF-8"/>
</bean>
<bean class="org.springframework.http.converter.json.MappingJackson2HttpMessageConverter">
<property name="objectMapper">
<bean class="org.springframework.http.converter.json.Jackson2ObjectMapperFactoryBean">
<property name="failOnEmptyBeans" value="false"/>
</bean>
</property>
</bean>
</mvc:message-converters>
</mvc:annotation-driven>

SSM 整合

1
2
3
4
5
6
7
8
9
10
11
12
13
14
15
16
-- 建表
CREATE DATABASE ssmbuild;
USE ssmbuild;

CREATE TABLE `books`(
`bookID` INT NOT NULL AUTO_INCREMENT COMMENT '书id',
`bookName` VARCHAR(100) NOT NULL COMMENT '书名',
`bookCounts` INT NOT NULL COMMENT '数量',
`detail` VARCHAR(200) NOT NULL COMMENT '描述',
KEY `bookID`(`bookID`)
)ENGINE=INNODB DEFAULT CHARSET=utf8;

INSERT INTO `books`(`bookID`,`bookName`,`bookCounts`,`detail`)VALUES
(1,'Java',1,'从入门到放弃'),
(2,'MySQL',10,'从删库到跑路'),
(3,'Linux',5,'从进门到进牢');

Issues

启动报错 一个或多个筛选器启动失败。完整的详细信息将在相应的容器日志文件中找到, 这个是适配 web support 的时候没有添加 lib 包导致的

Tomcat 下的 catalina.properties 修改了配置 ‘tomcat.util.scan.StandardJarScanFilter.jarsToSkip=*.jar’ 导致 jstl 解析出问题抛异常 无法在web.xml或使用此应用程序部署的jar文件中解析绝对uri 改回到默认配置,修复。花了2个小时排错,之前告诉我这个该法的人真想把它拖出去枪毙18遍!参考 cnblog

Ajax

拦截器

拦截器之访问 controller 方法,不会拦截静态资源(js 等)

项目突然坏了,干!!! 关了,最后三讲直接云上课看看完了

例举 UML 图中常见的关系及其表示方式

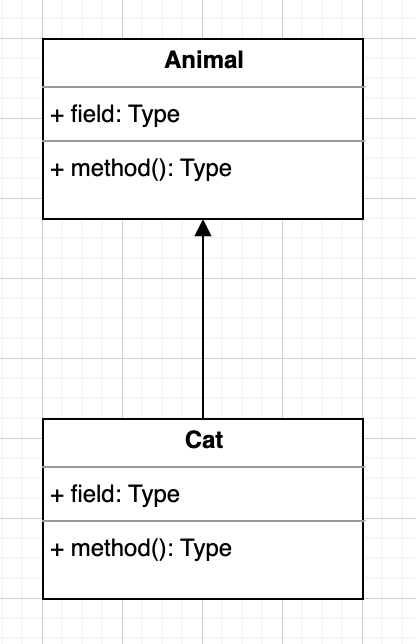
泛化 Generalization

对应 Java 中的继承,实线 + 实心三角指向父类

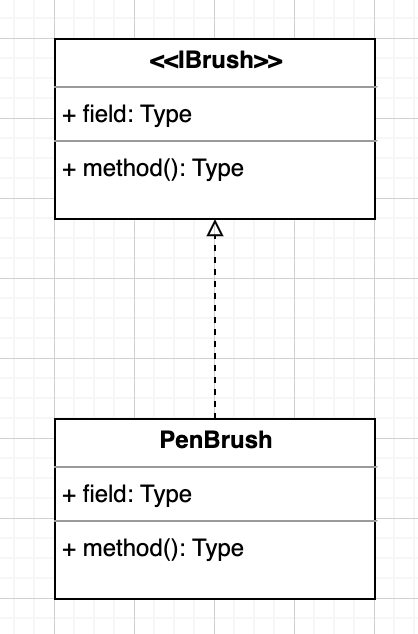
实现 Realization

对应 Java 中的实现,虚线 + 空心三角指向接口

关联 Association

对应 Java 中的成员变量,拥有关系,使一个类知道另一个类的属性和方法,可单向可双向。实心线 + 普通箭头指向被拥有者

聚合 Aggregation

整体与部分的关系,比如车和轮胎。他是一种强关联关系。空心菱形指向整体 + 实线 + 普通箭头指向部分

组合 Composition

整体与部分的关系,程度比聚合还要强的关联关系。实心菱形指向整体 + 实线 + 普通箭头指向部分

依赖 Dependency

对应 Java 中的局部变量,方法参数和静态方法调用,是一种使用的关系,所以要尽量不使用双向的互相依赖。虚线 + 普通箭头指向被使用者

参考文档

Builder Pattern: 将一个复杂对象的构建与它的表示分离, 使得同样的构建过程可以创建不同的表示. 建造者模式是一种对象创建型模式.

关键词: 构建过程, 表示

UML

图示说明:

  • Client 到 Director 为 实线普通箭头, 表示拥有
  • Client 到 ConcreateBuilder 为 虚线普通箭头, 表示使用关系, Java 中表现为局部变量
  • Director 到 Builder 为 空心菱形 + 实线 + 普通箭头, 表示聚合, 整体和局部的关系
1
2
3
4
5
6
7
8
9
10
11
12
13
14
15
16
17
18
19
20
21
22
23
24
25
26
27
28
                     +--------+                                                                                                                       
-------------| Client |-----------------
| +--------+ |
| |
| |
v |
+-----------------+ |
| Director | +---------------+ |
|-----------------|<>----->| Builder | |
| builder:Builder | |---------------| |
|-----------------| |+ buildPart() | |
| construct() | +---------------+ |
| | ^ |
+-----------------+ | |
| |
| v
+----------------------+
| ConcreateBuilder |
|----------------------|
|+ buildPart() |
|+ getResult():Product |
+----------------------+
|
|
|
+----v----+
| Product |
+---------+

Java 简化版

案例, 创建一个有五个属性的 computer 对象

创建方案有两种:

1
2
3
4
5
6
7
8
9
10
11
12
13
14
15
16
17
18
19
20
21
22
23
24
25
26
27
28
29
30
31
// 方案一, 重载构造函数
public class Computer {
public Computer(String cpu, String ram) {
this(cpu, ram, 0);
}

public Computer(String cpu, String ram, int usbCount) {
this(cpu, ram, usbCount, "罗技键盘");
}

public Computer(String cpu, String ram, int usbCount, String keyboard) {
this(cpu, ram, usbCount, keyboard, "三星显示器");
}

public Computer(String cpu, String ram, int usbCount, String keyboard, String display) {
this.cpu = cpu;
this.ram = ram;
this.usbCount = usbCount;
this.keyboard = keyboard;
this.display = display;
}
//...
}

// 方案二, 使用 new + set
public class Computer {
public void setCpu(String cpu) {
this.cpu = cpu;
}
// 省略其他 set 方法
}
  1. 使用构造函数 - 弊端: 参数过多, 增加阅读, 调用复杂度
  2. 使用 new + set - 弊端: 不连续, 可能少设置属性什么的

Java 简化版方案:

  1. 在对象内部创建一个 public 的内部静态类 Builder
  2. 复制一份对象的属性到 Builder 中
  3. Builder 提供 set 方法
  4. 在对象内部添加一个私有的构造函数, 参数为 Builder
  5. 通过链式调用 Builder 创建对象
1
2
3
4
5
6
7
8
9
10
11
12
13
14
15
16
17
18
19
20
21
22
23
24
25
26
27
28
29
30
31
32
33
34
35
36
37
38
39
40
41
42
43
44
45
46
47
48
@Data
public class Computer {
private String cpu;//必须
private String ram;//必须
private int usbCount;//可选
private String keyboard;//可选
private String display;//可选

private Computer(Builder builder) {
this.cpu = builder.cpu;
this.ram = builder.ram;
this.usbCount = builder.usbCount;
this.keyboard = builder.keyboard;
this.display = builder.display;
}

public static class Builder {
private String cpu;//必须
private String ram;//必须
private int usbCount;//可选
private String keyboard;//可选
private String display;//可选

public Builder(String cup, String ram) {
this.cpu = cup;
this.ram = ram;
}

public Builder setUsbCount(int usbCount) {
this.usbCount = usbCount;
return this;
}

public Builder setKeyboard(String keyboard) {
this.keyboard = keyboard;
return this;
}

public Builder setDisplay(String display) {
this.display = display;
return this;
}

public Computer build() {
return new Computer(this);
}
}
}

传统方式

涉及到的角色:

  • Builder: 抽象接口, 定义了一系列需要实现的接口
  • ConcreateBuilder: 具体的 Builder 实现类
  • Production: 生成的产品
  • Director: 具体 Builder 调用方法顺序的类

和上面的 Java 简化版相比, 传统模式只不过是把类内部的 Builder 实现独立出来了而已, 并没有什么其他很骚的操作. 不过相比于简单的版本, 它提供了 Builder 的扩展性, 在这个实现里, ConcreateBuilder 可以有多个版本的实现, 客户端可以根据实际需求调用所需要的 Builder.

1
2
3
4
5
6
7
8
9
10
11
12
13
14
15
16
17
18
19
20
21
22
23
24
25
26
27
28
29
30
31
32
33
34
35
36
37
38
39
40
41
42
43
44
45
46
47
48
49
50
51
52
53
54
55
56
57
58
59
60
61
62
63
64
65
66
67
68
69
70
71
72
73
74
75
76
77
78
79
80
81
82
83
84
85
86
87
88
89
90
91
92
93
94
95
96
97
98
99
100
101
102
103
104
105
106
107
108
109
110
111
112
113
114
115
116
117
118
119
120
121
122
123
124
125
126
127
128
129
130
131
132
133
// production 类
public class Computer {
private String cpu;//必须
private String ram;//必须
private int usbCount;//可选
private String keyboard;//可选
private String display;//可选

public Computer(String cpu, String ram) {
this.cpu = cpu;
this.ram = ram;
}

public void setUsbCount(int usbCount) {
this.usbCount = usbCount;
}

public void setKeyboard(String keyboard) {
this.keyboard = keyboard;
}

public void setDisplay(String display) {
this.display = display;
}

@Override
public String toString() {
return "Computer{" +
"cpu='" + cpu + '\'' +
", ram='" + ram + '\'' +
", usbCount=" + usbCount +
", keyboard='" + keyboard + '\'' +
", display='" + display + '\'' +
'}';
}
}

// Builder 接口
public interface ComputerBuilder {
void setUsbCount();

void setKeyboard();

void setDisplay();

Computer getComputer();
}

// 具体实现类, 分别组装两种品牌的电脑
public class MacBuilder implements ComputerBuilder {
private Computer computer;

public MacBuilder(String cpu, String ram) {
this.computer = new Computer(cpu, ram);
}

@Override
public void setUsbCount() {
this.computer.setUsbCount(2);
}

@Override
public void setKeyboard() {
this.computer.setKeyboard("Mac Keyboard");
}

@Override
public void setDisplay() {
this.computer.setDisplay("Mac Display");
}

@Override
public Computer getComputer() {
return this.computer;
}
}

public class LenovoBuilder implements ComputerBuilder {
private Computer computer;

public LenovoBuilder(String cpu, String ram) {
this.computer = new Computer(cpu, ram);
}

@Override
public void setUsbCount() {
this.computer.setUsbCount(3);
}

@Override
public void setKeyboard() {
this.computer.setKeyboard("Logic");
}

@Override
public void setDisplay() {
this.computer.setDisplay("ThinkVision");
}

@Override
public Computer getComputer() {
return this.computer;
}
}

// director 控制流程

public class ComputerDirector {
public void makeComputer(ComputerBuilder builder) {
// 定制组装顺序
builder.setDisplay();
builder.setKeyboard();
builder.setUsbCount();
}
}

// 测试类
@Test
public void test_builder() {
ComputerDirector director = new ComputerDirector();

MacBuilder macBuilder = new MacBuilder("I5", "Sansong 4G");
director.makeComputer(macBuilder);
System.out.println(macBuilder.getComputer());

LenovoBuilder lenovoBuilder = new LenovoBuilder("I7", "Kingston 8G");
director.makeComputer(lenovoBuilder);
System.out.println(lenovoBuilder.getComputer());
}

// output
// Computer{cpu='I5', ram='Sansong 4G', usbCount=2, keyboard='Mac Keyboard', display='Mac Display'}
// Computer{cpu='I7', ram='Kingston 8G', usbCount=3, keyboard='Logic', display='ThinkVision'}

建造者模式在 StringBuilder 中的应用

TODO

Effective Java item 2 摘录

参考文档